Español
Hola a todos amigos espero que estén muy bien.
Antes que nada es un placer para mí participar por primera vez en esta comunidad. Yo soy un amante de la cocina y el buen comer y espero ser bienvenido con mi contenido a esta bella comunidad. A mí me gusta mucho enseñar así que acá compartiré paso a paso de valiosas recetas que he aprendido a lo largo de los años y esta será la primera 😁.
El día de hoy como mi primera receta en esta plataforma un tutorial dónde les enseñaré a elaborar un delicioso Pan Dulce hecho en casa. Además les enseñaré algunos tips de panadería que no cualquiera les va a enseñar. Espero les guste
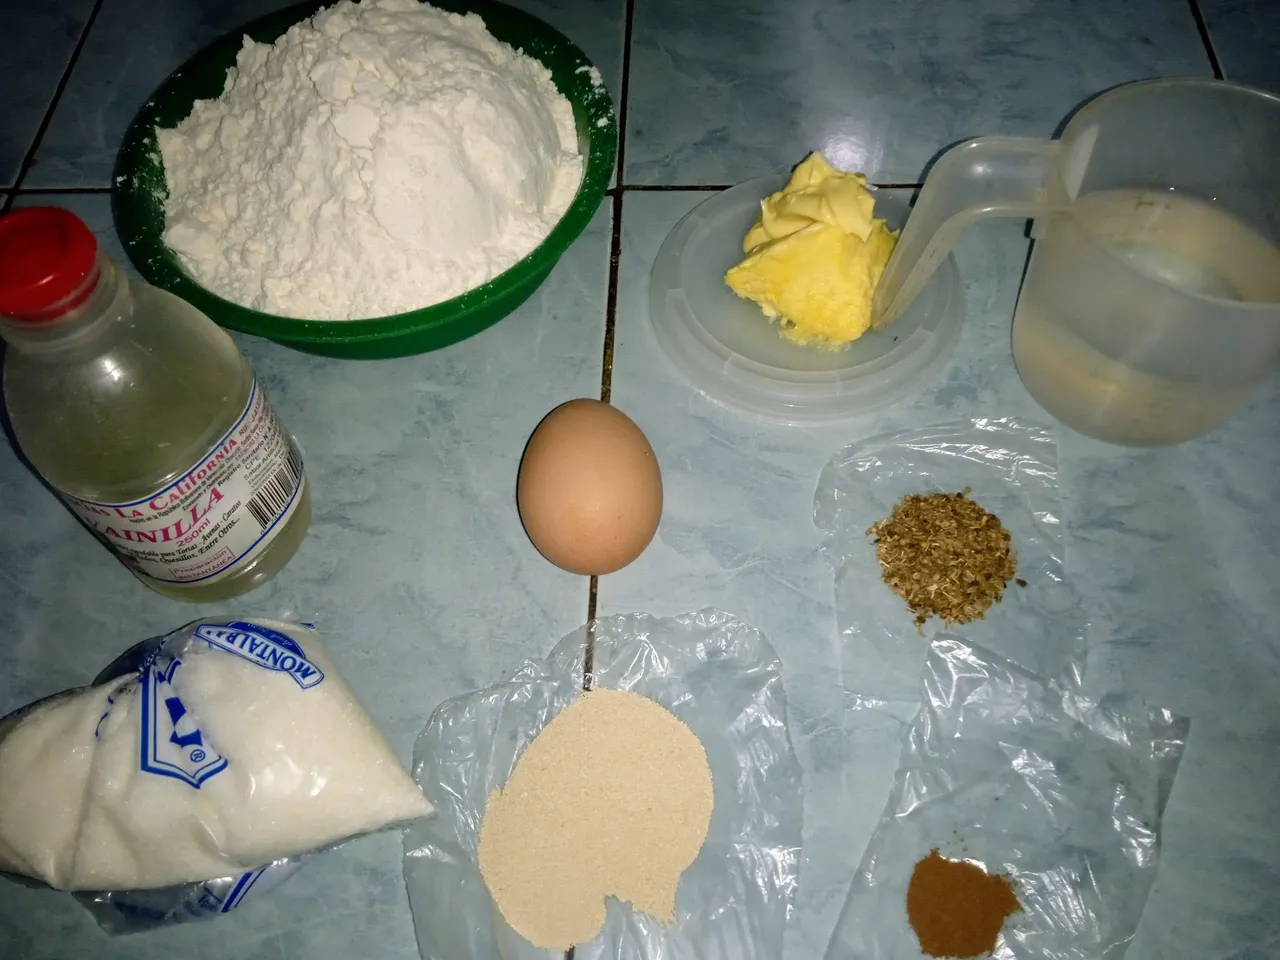
Para esta preparación necesitamos:
- 500 gramos de harina de trigo panadera (o puede ser harina de trigo 00)
- 150 gramos de azúcar
- 40 gramos de Margarina con sal o manteca vegetal (de utilizar manteca debes agregar 3 gramos de sal)
- 1 huevo
- 200ml de agua tibia (importante debe estar al rededor de 50° de temperatura).
- 1 cucharada de levadura instantánea
- 1/2 cucharada de esencia de vainilla
- 1/2 cucharadita de canela en polvo
- 1/2 cucharada de anís en granos.
Paso a Paso
Antes que nada debemos activar la levadura
Me atrevo a decir que este es el paso más importante de la preparación ya que en este verificamos que nuestra levadura está en óptimas condiciones. De no estarlo también sabremos que el ingrediente está dañado y debemos desecharlo.
En una taza colocamos la mitad de nuestra agua, una cucharada de harina de trigo, una cucharada de azúcar, mezclamos bien y luego agregamos la levadura y mezclamos bien sin dejar grumos
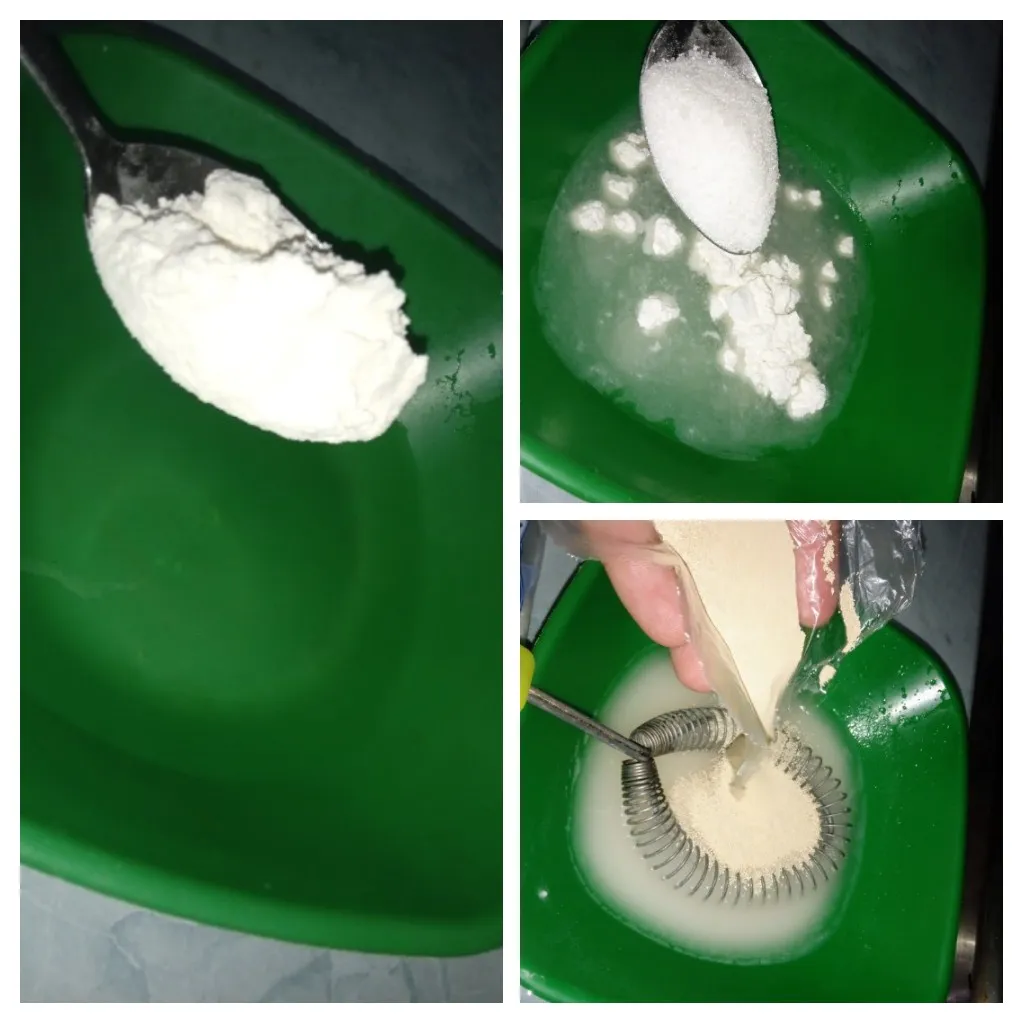
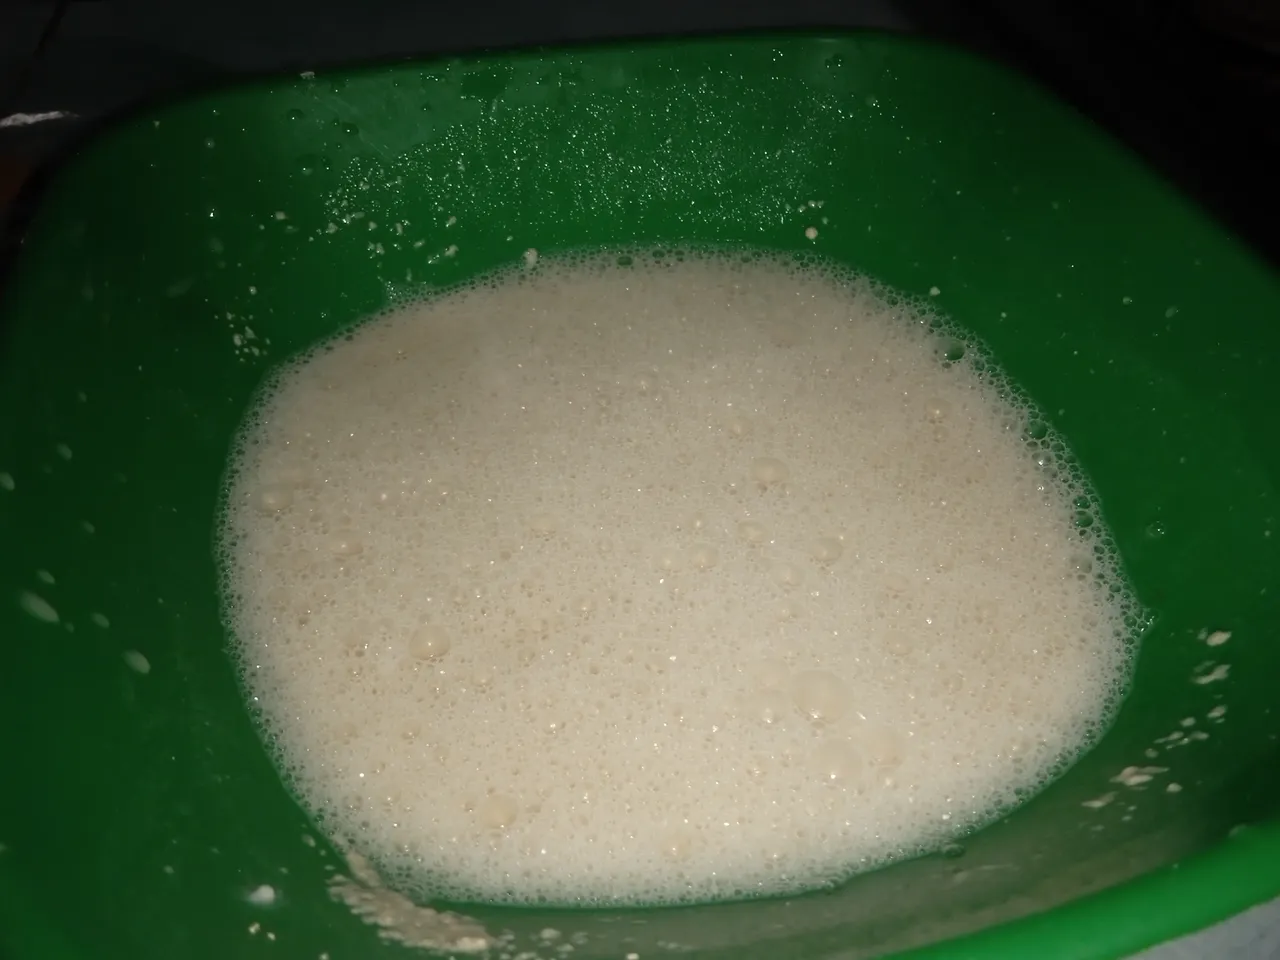
Luego colocamos un pañuelo húmedo y tapamos nuestra taza sin que el pañuelo toque la mezcla. Dejamos reposar por 5 minutos. Si en 5 minutos la levadura hace espuma y aumenta su tamaño significa que está activada, está buena y se puede utilizar
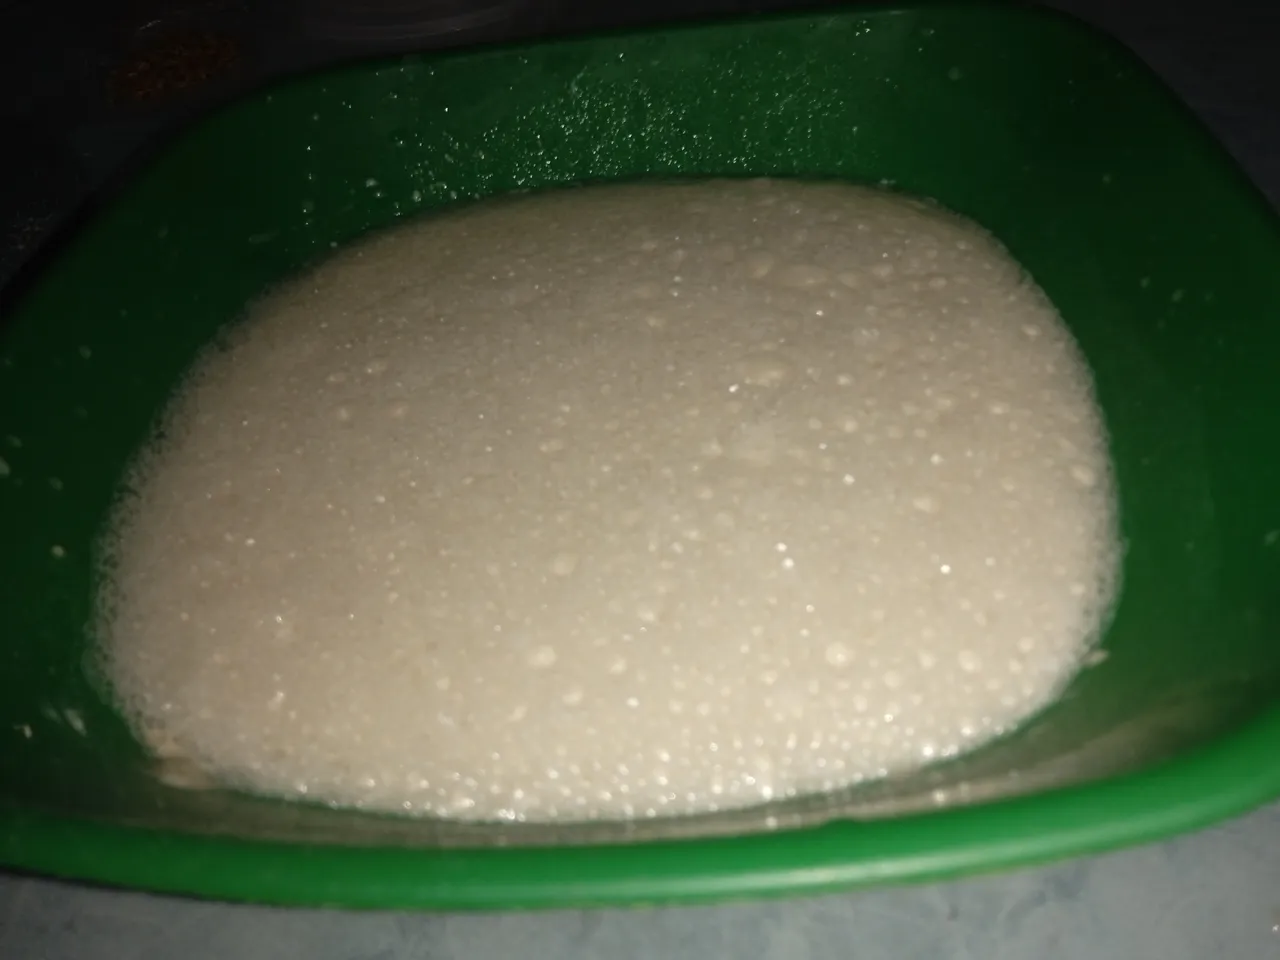
Si por alguna razón la levadura no hace espuma debemos repetir este proceso con agua y levadura nueva, es importante utilizar agua tibia y harina de trigo con un valor mínimo de 12% de gluten por cada 100 gramos ya que la levadura se activa con el calor y esta se alimenta del gluten de la harina. Si no hay calor o la harina no tiene gluten difícilmente se activará. Por otra parte si después del primer intento no se activa, lo intentamos una segunda vez y si tampoco funciona es mejor no realizar la preparación ya que simplemente no funcionará la receta.
Iniciamos con el amasado:
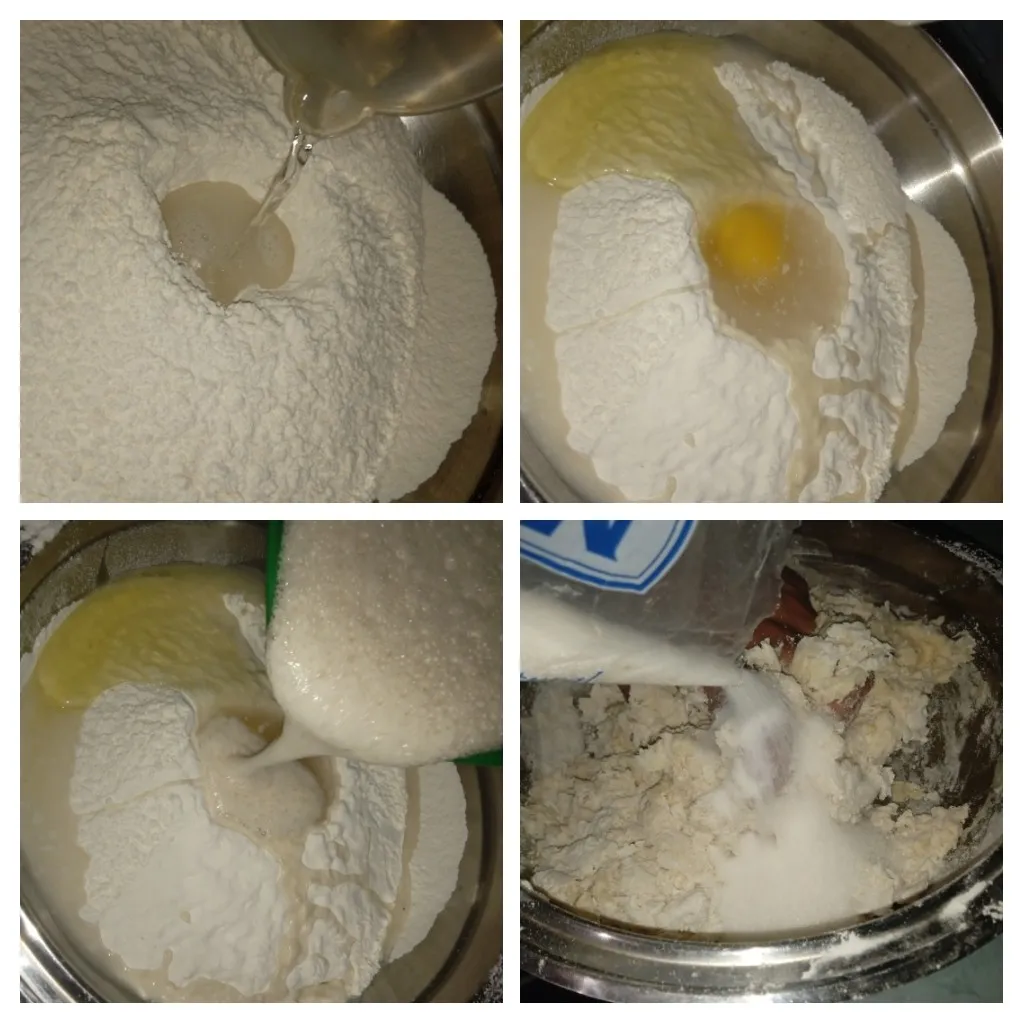
En un bold colocamos la harina de trigo, el azúcar, el huevo, el resto del agua y nuestra mezcla con levadura ya activada y empezamos a mandar desde el bold. Esto lo haremos por un par de minutos hasta obtener una mezcla manejable.
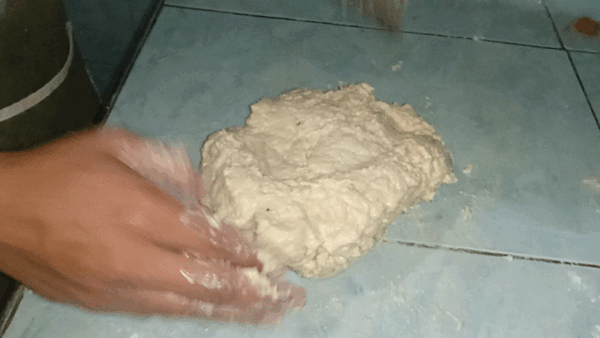
Pasados los dos minutos retiramos nuestra masa del bold y la colocamos en un mesón y empezamos a amasar con fuerza por 8 minutos.

Es importante que apliquemos fuerza durante el amasado ya que este será el que le otorgue suavidad al pan y hará que el gluten se active y nuestra masa crezca sin problemas. Podemos amasar de la manera que queramos pero siempre aplicando fuerza y sin detener el movimiento

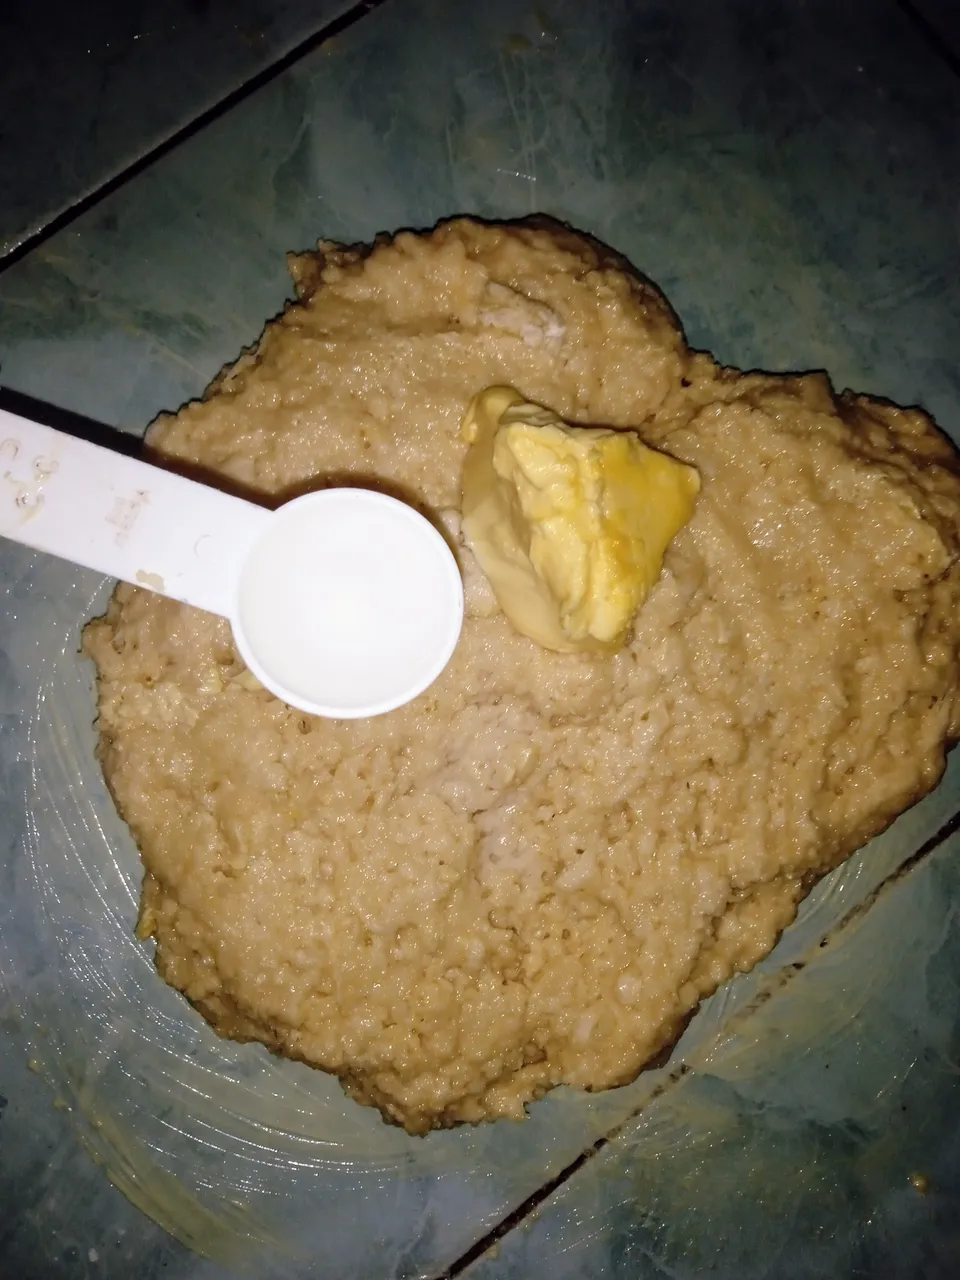
Pasados los 8 minutos de amasado hacemos una pausa, aplastamos un poco la masa y sobre ella colocamos nuestra materia grasa y la vainilla
Luego de esto seguimos amasando por 10 minutos mas. Al principio les costará un poco porque están agregando más líquido a la mezcla, yo recomiendo de aquí en adelante utilizar una espátula para ayudarte
Amasamos bien por unos 8 minutos, así garantizaremos que nuestros ingredientes están muy bien integrados.
Luego de esto agregamos la canela y el anís y seguimos amasando por dos minutos más.

Luego de estar bien unidos y bien distribuidos en nuestra masa todos nuestros ingredientes la masa está lista.
Todo proceso de amasado de panadería de manera manual requiere de un tiempo de amasado de mínimo 18 minutos para garantizar que la masa esté fuerte y el gluten esté activo.
Le daremos forma al pan
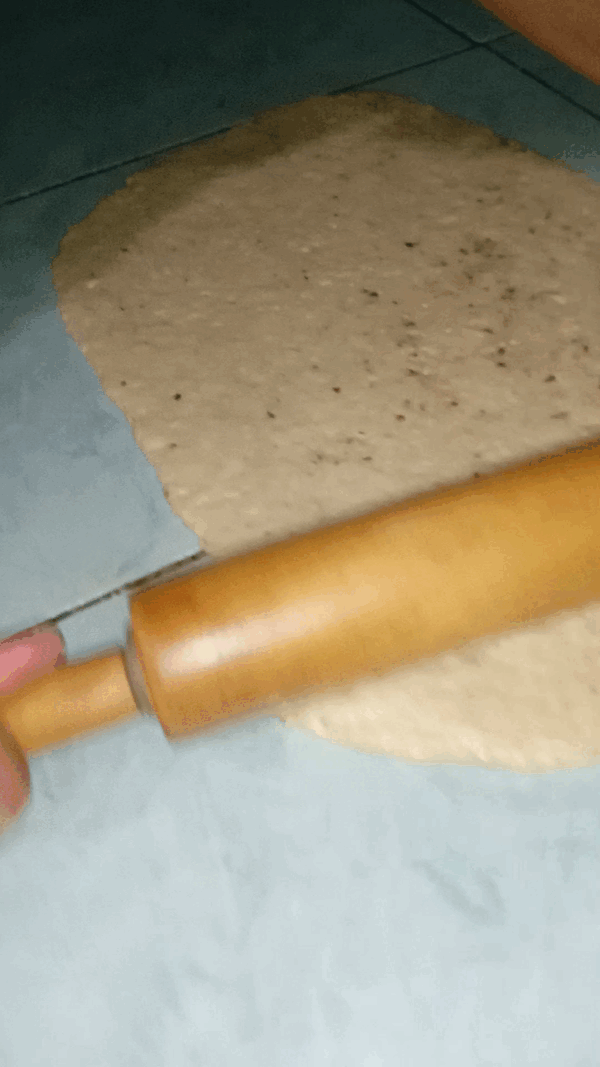
Luego de amasar, pensamos nuestra masa. En mi caso mi mezcla pesaba 950 gramos así que separé esa masa en dos de manera exacta. Luego con ayuda de un rodillo estiramos la masa sobre nuestro mesón.
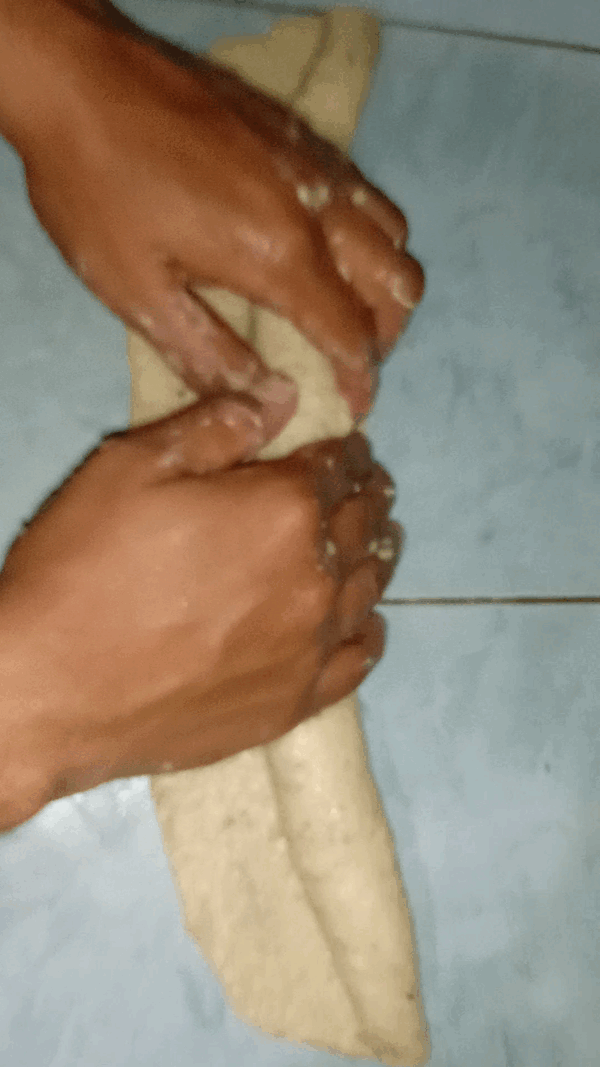
Luego con ayuda de nuestras manos enrrollamos nuestro pan
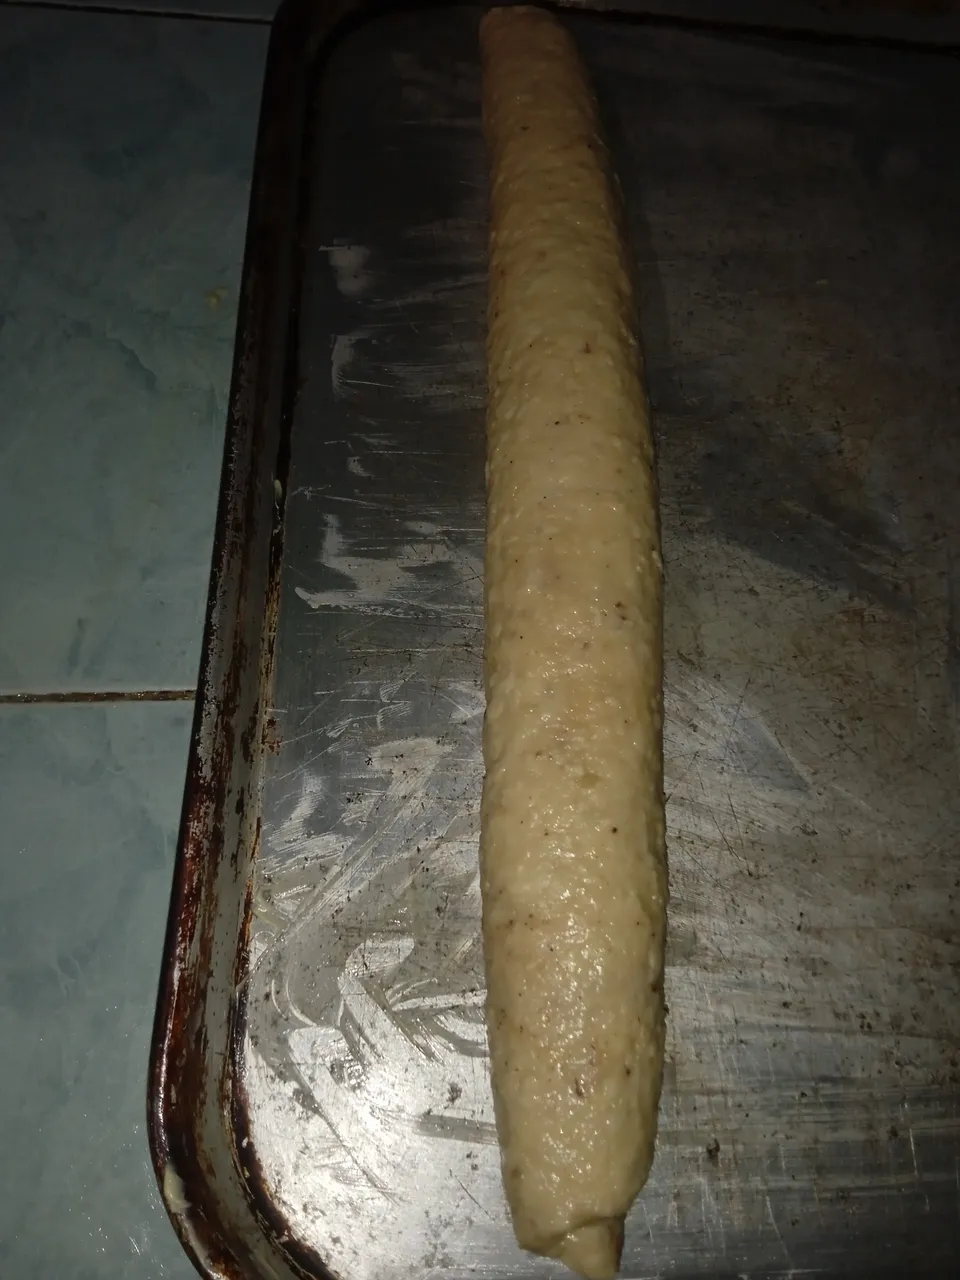
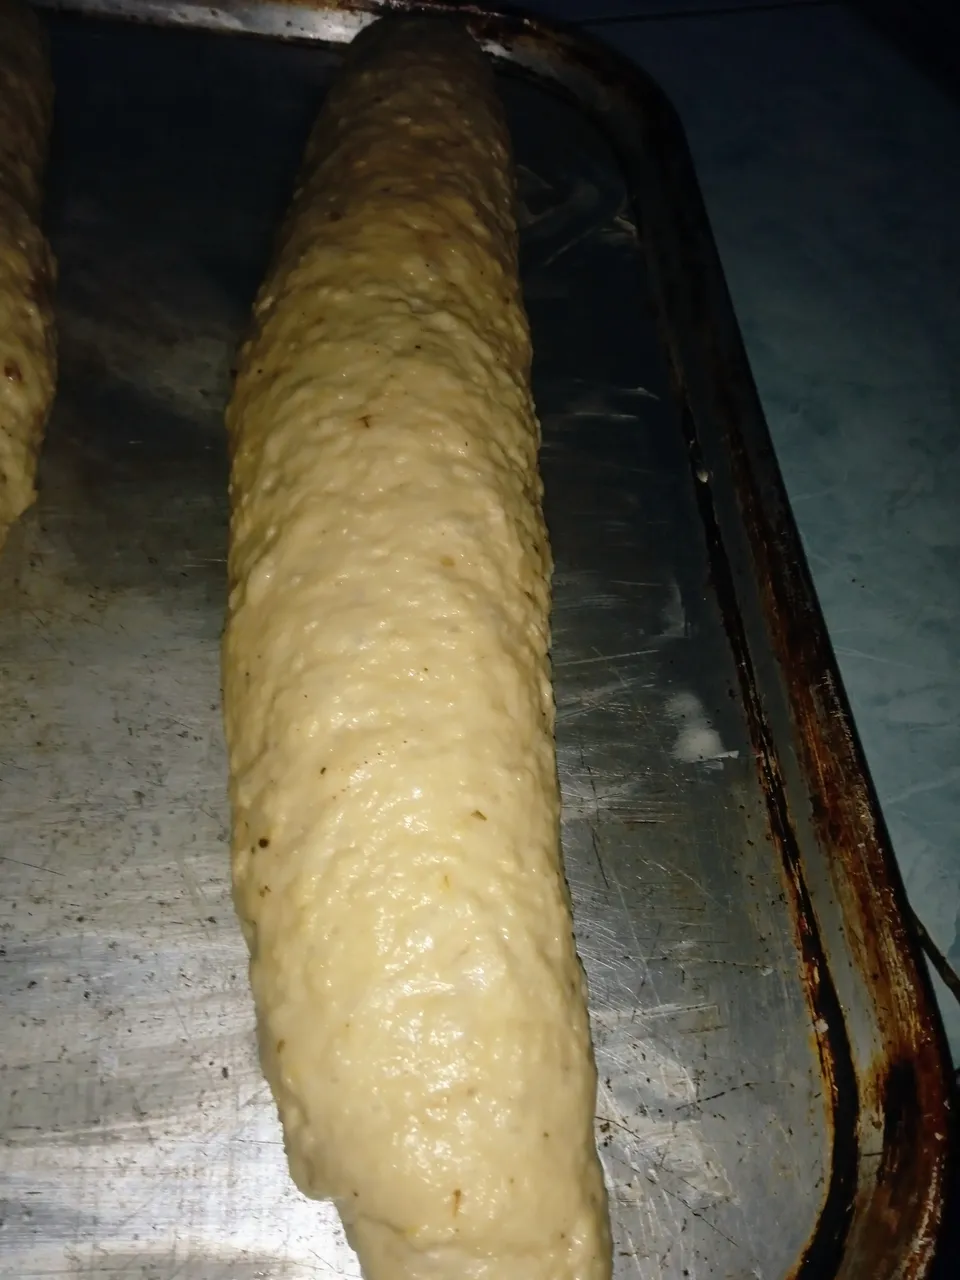
Y por último lo colocamos sobre una bandeja de horno previamente engrasada y llevamos a reposar por un rato a un lugar cálido hasta duplicar el tamaño.
El tiempo aquí será relativo, todo dependerá del calor que haya en el ambiente, si estas en una cocina con aire acondicionado es importante que lleves tu mezcla a otra parte ya que si tu mezcla permanece allí llevará horas para que el pan crezca; en cambio si tú colocas tus panes en un lugar cálido (pero a temperatura ambiente) tus panes no tardarán más de una hora en duplicar tamaño.
Llevamos nuestros panes al horno
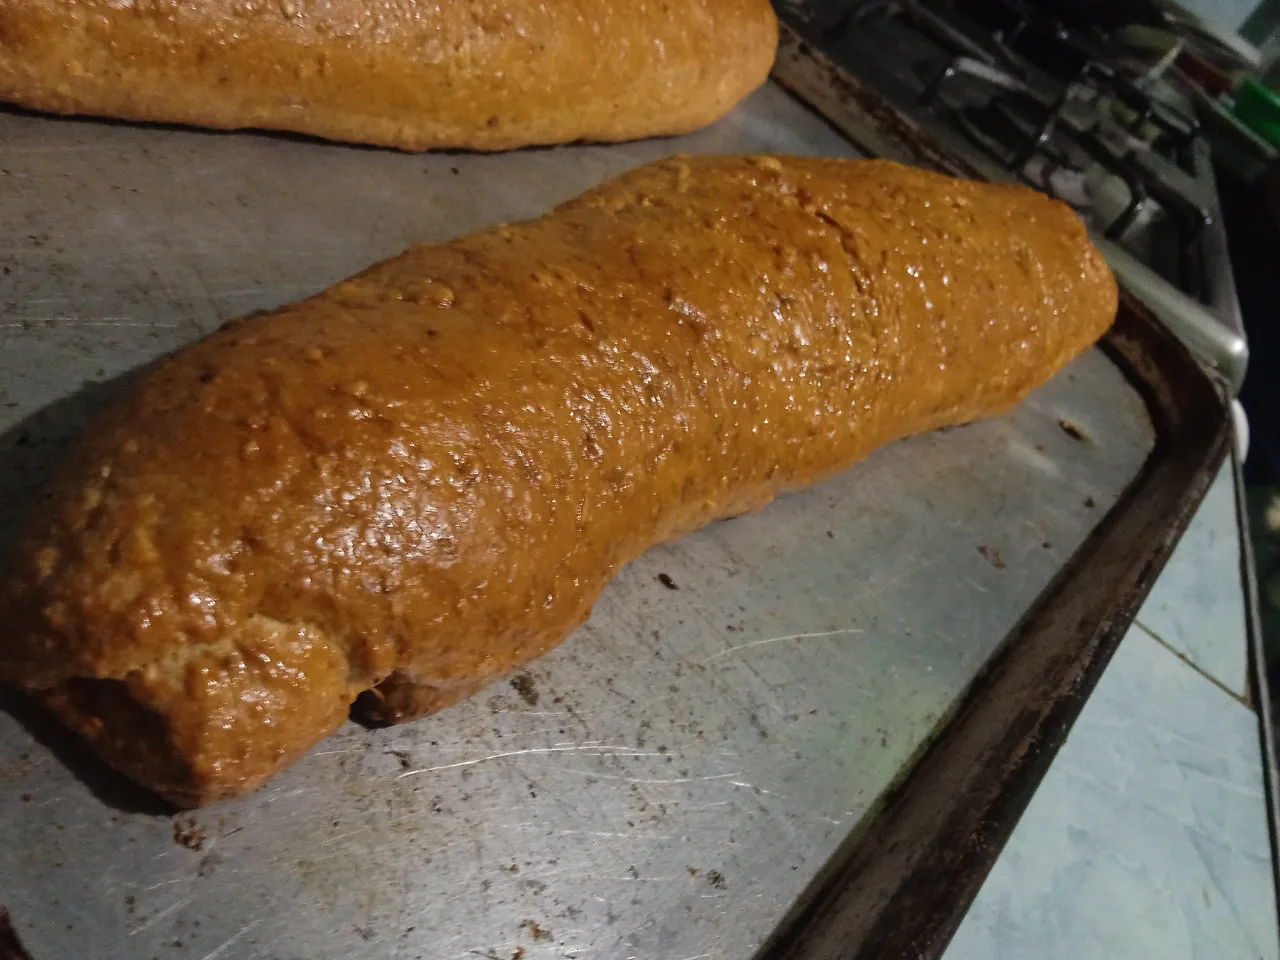
Luego de ya los panes haber duplicado el tamaño llevamos al horno por unos 30 minutos o hasta dorar bien. Es importante que el pan dore por sí solo, el color deseado se lo otorgan ustedes.
Una vez dore nuestro pan procedemos a barnizar para realizar el color del pan. En mi caso yo barnicé con melaza que tenía en casa

Después de barnizar regresamos el pan al horno por 5 minutos más para que el barniz se cocine y le realce el color al pan 😍🥰.
Luego de esto nuestro pan está listo. Sacamos del horno y lo dejamos reposar
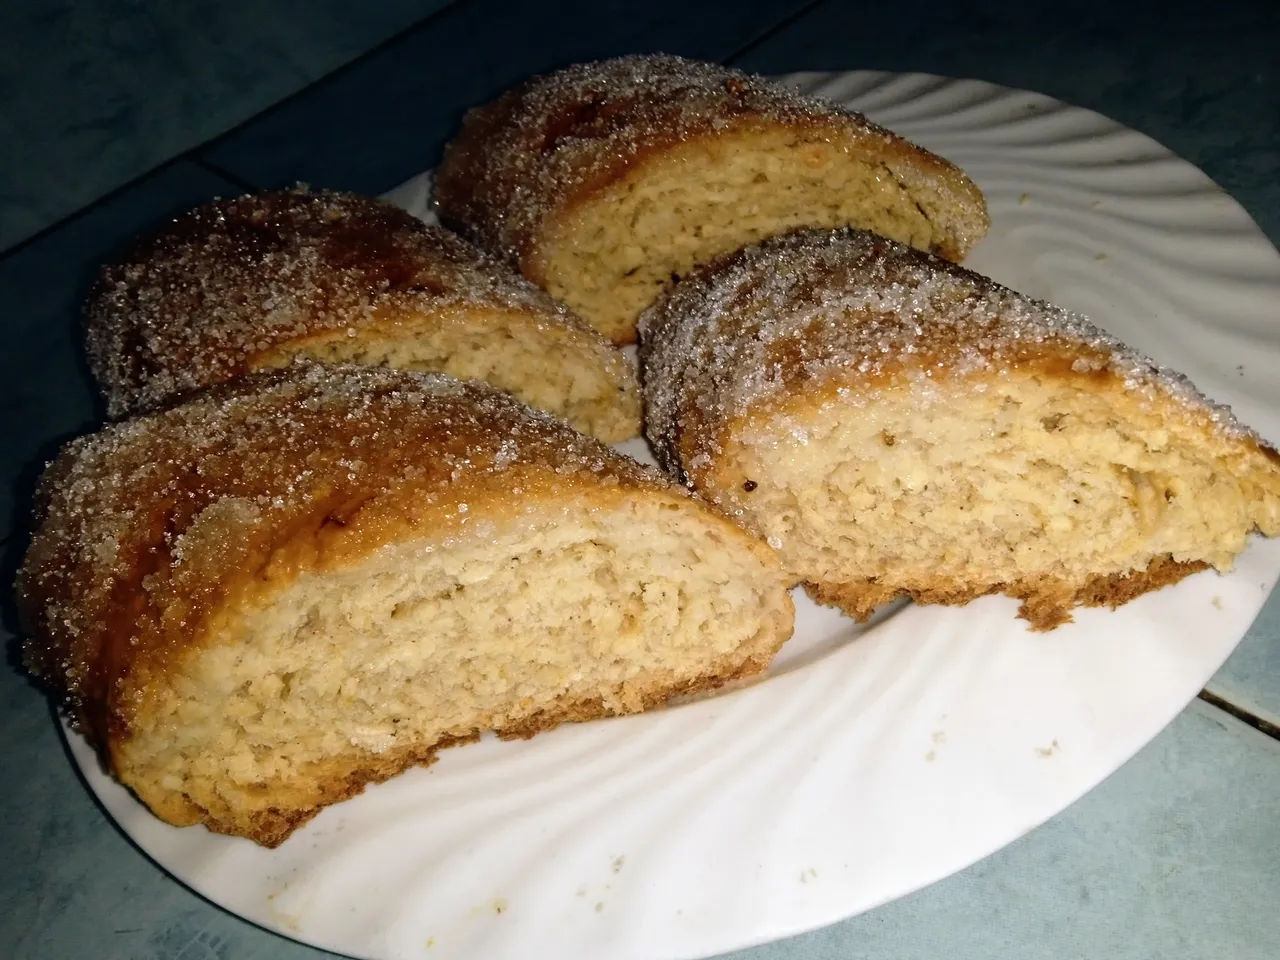
Una vez nuestro pan haya reposado podemos aplicar un poco más de barniz y espolvorear azúcar para que este se pegue al pan y se convierta en decoración del mismo. Luego de esto ahora sí estamos listo para comer 😍😄🤩


El pan quedó delicioso, a esto le llamo pan dulce como Dios manda 😍. Suave, pesadito y con volumen.
Las fotografías fueron tomadas desde mí Redmi 9A
Muchas gracias por su visita 😁🥰🙈

English
Hello to all friends I hope you are very well.
First of all it is a pleasure for me to participate for the first time in this community. I am a lover of cooking and good food and I hope to be welcome with my content to this beautiful community. I really like teaching so here I will share step by step of valuable recipes that I have learned over the years and this will be the first 😁.
Today as my first recipe on this platform is a tutorial where I will teach you how to make a delicious Homemade Pan Dulce. I will also teach you some bakery tips that not everyone is going to teach you. I hope you like it
For this preparation we need:
- 500 grams of bakery wheat flour (or it can be 00 wheat flour)
- 150 grams of sugar
- 40 grams of Margarine with salt or vegetable shortening (if you use butter you must add 3 grams of salt)
- 1 egg
- 200ml of warm water (important temperature must be around 50°).
- 1 tablespoon instant yeast
- 1/2 tablespoon vanilla essence
- 1/2 teaspoon ground cinnamon
- 1/2 tablespoon of anise grains.
Step by Step
First of all we must activate the yeast
I dare to say that this is the most important step of the preparation since in this we verify that our yeast is in optimal conditions. If it is not, we will also know that the ingredient is damaged and we must discard it.
In a cup we put half of our water, a tablespoon of wheat flour, a tablespoon of sugar, mix well and then add the yeast and mix well without leaving lumps
Then we put a damp handkerchief and cover our cup without the handkerchief touching the mixture. Let stand for 5 minutes. If in 5 minutes the yeast foams and increases in size, it means that it is activated, it is good and can be used
If for some reason the yeast does not foam, we must repeat this process with water and new yeast, it is important to use warm water and wheat flour with a minimum value of 12% gluten per 100 grams since the yeast is activated by the heat and it feeds on the gluten in the flour. If there is no heat or the flour does not have gluten, it will hardly activate. On the other hand, if after the first attempt it does not activate, we try it a second time and if it does not work either, it is better not to carry out the preparation since the recipe simply will not work.
We start with the kneading:
In a bold we place the wheat flour, the sugar, the egg, the rest of the water and our mixture with already activated yeast and we start to send from the bold. We will do this for a couple of minutes until we obtain a manageable mixture.
After two minutes we remove our dough from the bold and place it on a counter and begin to knead vigorously for 8 minutes.
It is important that we apply force during the kneading since this will be the one that gives softness to the bread and will make the gluten activate and our dough grows without problems. We can knead in the way we want but always applying force and without stopping the movement
After 8 minutes of kneading, we pause, flatten the dough a little and place our fat and vanilla on top of it.
After this we continue kneading for 10 more minutes. At first it will be a bit difficult because you are adding more liquid to the mixture, I recommend from now on to use a spatula to help you
We knead well for about 8 minutes, this way we will guarantee that our ingredients are very well integrated.
After this we add the cinnamon and anise and continue kneading for two more minutes.
After all our ingredients are well united and well distributed in our dough, the dough is ready.
All manual bakery kneading processes require a kneading time of at least 18 minutes to ensure that the dough is strong and the gluten is active.
We will shape the bread
After kneading, we think our dough. In my case, my mixture weighed 950 grams, so I separated that mass into two exactly. Then with the help of a rolling pin we stretch the dough on our counter.
Then with the help of our hands we roll up our bread
And finally we place it on a previously greased oven tray and take it to rest for a while in a warm place until it doubles in size.
The time here will be relative, everything will depend on the heat in the environment, if you are in a kitchen with air conditioning it is important that you take your mixture to another place since if your mixture remains there it will take hours for the bread to rise; On the other hand, if you place your loaves in a warm place (but at room temperature) your loaves will not take more than an hour to double in size.
We take our breads to the oven
After the loaves have doubled in size, we take them to the oven for about 30 minutes or until golden brown. It is important that the bread browns by itself, the desired color is given by you.
Once our bread browns, we proceed to varnish to make the color of the bread. In my case I varnished with molasses that I had at home
After varnishing we return the bread to the oven for 5 more minutes so that the varnish cooks and enhances the color of the bread 😍🥰.
After this our bread is ready. Take it out of the oven and let it rest.
Once our bread has rested we can apply a little more varnish and sprinkle sugar so that it sticks to the bread and becomes its decoration. After this now we are ready to eat 😍😄🤩
The bread was delicious, I call this sweet bread as God intended 😍. Soft, heavy and with volume.
The pictures were taken from my Redmi 9A